Have you ever spent hours sewing a crisp collar only to have it collapse after one wash? Or perhaps you’ve noticed your favorite suit jacket looking “bubbly” near the lapels? These mishaps usually stem from poor interlining application. In the garment industry, interlining is the “invisible skeleton” that provides structure and shape.
Whether you are crafting a high-end business suit or a delicate lady’s blouse, getting the bond right is non-negotiable. In this guide, we will break down the mechanics of heat, pressure, and timing. We will explore the different categories of interlining and the exact steps to achieve a professional finish. By the end, you’ll understand how to turn a limp piece of fabric into a structured masterpiece. Let’s dive into the technical world of garment stabilization.
Understanding Interlining: The Invisible Support
Interlining is a layer of fabric inserted between the outer garment material and the lining. Its primary purpose is to control the shape and reinforce specific areas like collars, cuffs, and waistbands. Without it, most fabrics would lack the tension required to maintain a professional silhouette.
What Is Fusible Vs. Non-Fusible?
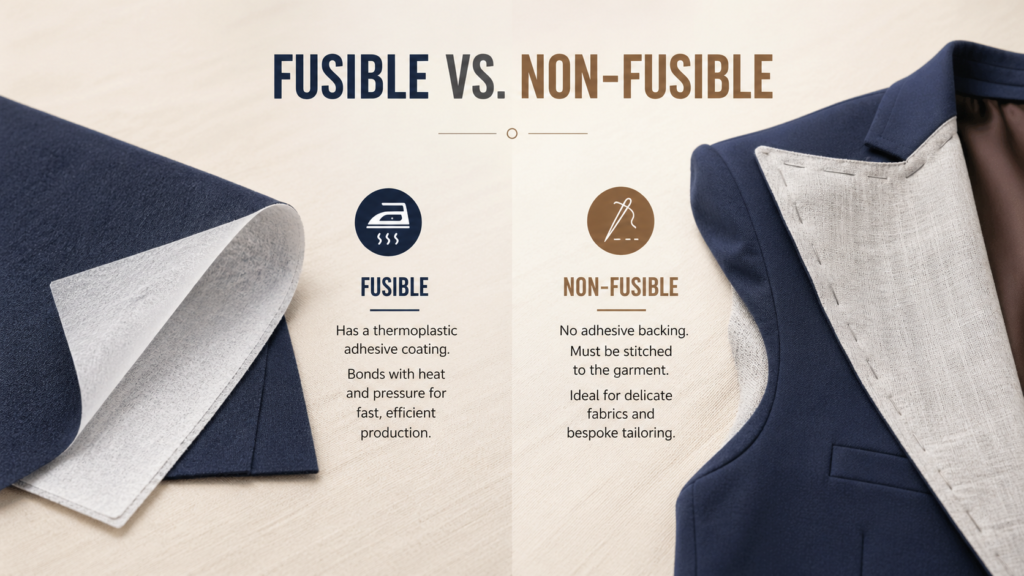
Interlinings generally fall into two main categories: Fusible and Non-fusible. Each serves a distinct purpose in the production cycle. You must choose based on your fabric’s heat tolerance.
Fusible interlining features a coating of thermoplastic adhesive on one side. When you apply heat and pressure, the glue melts and bonds to the garment fabric. It is the industry standard for modern, efficient production and high-volume manufacturing.
Non-fusible interlining has no adhesive backing. You must stitch it directly to the garment pieces. It is often preferred in bespoke tailoring or for delicate fabrics that cannot withstand high heat or chemical resins.
Why Fusing Matters For Garment Quality
Fusing isn’t just about making fabric stiffer. It is about structural integrity. When you fuse correctly, you prevent the outer fabric from stretching or distorting during the sewing process. This is critical for areas that face high stress.
Proper fusing also enhances the “hand feel” or drape of the garment. For example, a heavy coat needs a robust canvas interlining to maintain its bulk. Conversely, a silk blouse requires a lightweight, woven fusible to stay fluid.
Choosing the wrong type can lead to “strike-back” where glue seeps through. It can also cause “delamination” which is the glue peeling away. Both issues ruin the professional look of your final product.
The Technical Specs: Choosing Your Interlining
Before you touch the iron or the fusing machine, you need to select the right material. Interlinings are categorized by their construction and weight. You should match the properties to your specific garment type.
Categories Of Interlining
| Type | Construction | Best Use Case |
| Woven | Loom-constructed, stable | Business shirts, suit lapels, waistbands |
| Non-Woven | Chemical/thermal bonded fibers | Casual wear, embroidery backing, disposable gear |
| Knitted | Looped fibers, offers stretch | Jersey fabrics, knitwear, jackets |
| Hair Canvas | Natural fibers (horsehair/wool) | Traditional men’s suits, high-end tailoring |
Weight And Balance
Always match the weight of your interlining to your fabric. A general rule of thumb is that the interlining should be slightly lighter than the garment fabric. This ensures the support does not overpower the drape.
If the interlining is too heavy, the garment will look stiff and unnatural. If it is too light, it won’t provide enough support. Pre-testing a small swatch is the best way to verify the final hand feel.
Check out our latest blog on how to check the quality of shirt fusible interlining.
How To Fuse Interlining: The Professional Workflow
Fusing is a science, not an art. It relies on three critical variables: Temperature, Time, and Pressure. Professionals often refer to this as the “Fusing Trinity.” If one element is off, the bond will eventually fail.
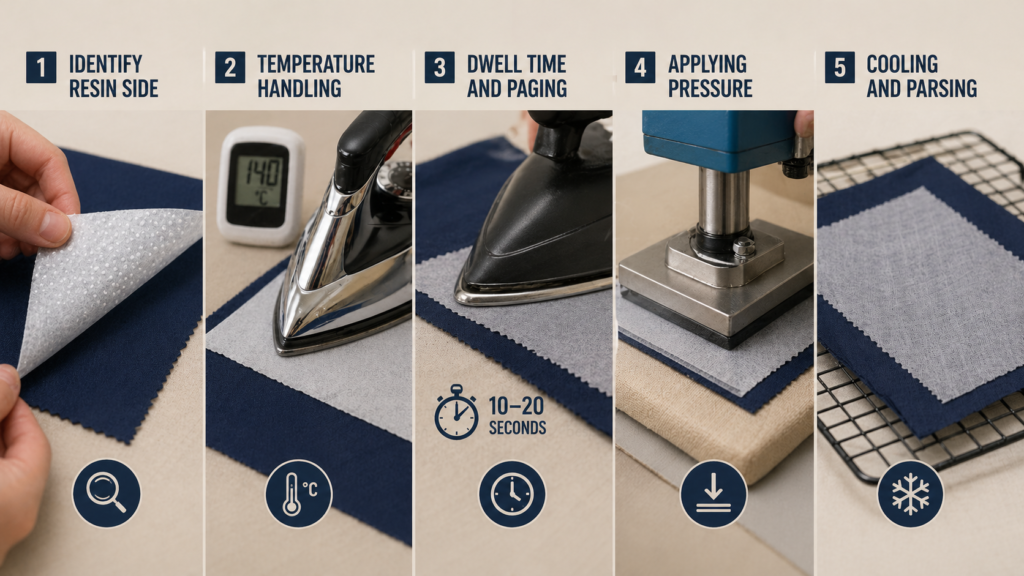
Step 1: Identify Resin Side
First, identify the resin side of the interlining. You can usually feel a “bumpy” texture on the side with the glue dots. Place this side against the wrong side of your garment fabric.
Ensure your fabric is clean and free of lint. Any debris trapped under the interlining will create a permanent bump. Double-check your alignment before applying any heat to the surface.
Step 2: Temperature Handling
Every adhesive has a specific melting point. Most polyamide or polyester resins melt between 120°C and 150°C. Check the manufacturer’s spec sheet before you start your project.
If the heat is too low, the resin won’t liquefy properly. If it is too high, you might scorch the fabric. High heat can also cause the glue to evaporate or sink too deep into the fibers.
Step 3: Dwell Time And Paging
Dwell time is how long the heat is applied to the fabric. This usually ranges from 10 to 20 seconds. You must hold the pressure steady throughout this entire duration.
Do not slide the iron or the press head. Sliding can cause the interlining to shift. This leads to wrinkles that are impossible to remove once the glue cools and sets.
Step 4: Applying Pressure
Pressure ensures the liquefied resin penetrates the fibers of the outer fabric. In a factory setting, we use pneumatic or hydraulic presses. At home, you must use firm, downward body weight.
Ensure the pressure is even across the entire surface area. Uneven pressure is the leading cause of bubbling. Address the edges carefully as they are the most likely to peel.
Step 5: Cooling And Parsing
This is the most overlooked step in the fusing process. You must let the fabric cool completely before moving it. The bond is only “set” once the resin returns to a solid state.
Moving the fabric while it is still warm can break the bond. This leads to delamination later in the garment’s life. Lay the pieces flat on a cooling rack for at least thirty seconds.
Common Issues And How To Avoid Them
Even experts run into technical trouble occasionally. Strike-through happens when glue leaks through to the right side of the garment. It usually means your pressure was too high or your interlining was too thin.
Bubbling or delamination occurs when the bond fails after washing. It is often caused by insufficient heat or not allowing the piece to cool. Always verify your machine settings before a production run.
Shrinkage is another technical hurdle to watch for. Some interlinings shrink differently than the shell fabric. Always pre-wash your materials or pre-test a swatch to ensure both layers react similarly to heat.
TL;DR: The Quick Fusing Guide
- Select: Match interlining weight to your specific fabric weight.
- Position: Place the rough glue side to the wrong side of the fabric.
- Heat: Set your device between 180°C and 150°C based on the resin.
- Press: Apply firm, vertical pressure for 12 to 15 seconds without sliding.
- Cool: Let the piece sit flat until it is completely cold to the touch.
Conclusion
Fusing interlining is a foundational skill in professional garment construction. By understanding the relationship between heat, time, and pressure, you ensure your creations look professional. Remember, the interlining is the soul of the garment.
It provides the structure that allows the fashion fabric to shine. Treat the process with technical precision, and you will see immediate results. Your sewing quality will skyrocket, and your garments will stand the test of time.
Can I Fuse Interlining Using A Regular Steam Iron?
Yes, you can, but you must turn off the steam function. Steam can interfere with the chemical bond of some thermoplastic resins. Use a dry heat setting and apply firm manual pressure.
What If I Make A Mistake And Need To Remove The Interlining?
You can often reheat the area to liquefy the glue and gently peel it back. However, this may leave a sticky residue on the fabric. It is always better to get the alignment right the first time.
Does Interlining Go On The Facing Or The Main Garment Piece?
Generally, you fuse the interlining to the facing pieces, like the inner collar or button placket. However, in structured tailoring, you might fuse the entire front panel of a jacket. Always follow your specific pattern instructions.
Ready To Elevate Your Garment Quality?
Structure is the difference between “homemade” and “high-end.” Don’t let your hard work lose its shape after one wear. We specialize in the production of woven fusible and non-fusible interlining for shirts, business suits, and ladies’ fashion.